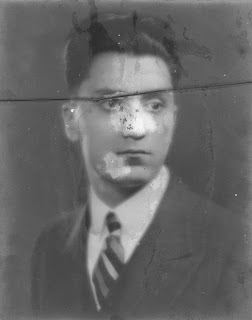
retouching stuff

here is a conversational worksheet i put together on retouching for my class at rmc. anyone have other points i could add or corrections etc? feel free to copy this for your own! :
Retouching
Here are some things to consider while retouching:
Light quality
What is the light quality of the image? From what angle is the light coming? What temperature is the light (warm, cool, or neutral)? Do you have direct or diffused light (shadows will reveal this)? Make sure any retouching decisions are in line with the light quality in your image. You may even need to add some fake shadows to keep your image consistent!
Where is the focus?
All images have a point of focus. This point of focus (or depth of field) may be narrow or deep. Cloning and image repair is easier when it needs to be done in a ‘soft focus’ area because the lack of texture is easier to match. In this situation you can use a lighter opacity to blend areas together (without worrying about losing texture).
Patterns
Sometimes, especially with beginning retouchers, we see patterns—basically a shape or part of a picture is repeated over and over in an area of retouching. See the same cloud 4 or 5 times in the sky? Keep an eye on this. The answer to this problem is to keep changing your sample point when cloning. This will prevent patterning in your retouching. Also, when you are working on an area, you want to sample from both sides of a problem area. This will help the retouched area transition smoothly from one side to the next.
Texture
Photographs often have areas of grain everywhere. If you zoom in on any image you will see film grain or pixels. Whatever you see, it needs to be uniform across the image. You may bring an element into your photograph and it will be too sharp or too blurry relative to everything around it. You may need to sharpen or blur gently your retouch area. If any area is in focus and has texture, you will need to have a hard brush (opacity 80-100%) and have fairly hard brush edges (65-100%) when working in that area. Beginning retouchers soften and lose texture in their retouching areas.
View at 100%, work like a painter
Make sure you are judging your retouching at 100% viewing percentage (you can check this on your navigation tab). This is the best barometer you’ll have if the changes you are making will look good when outputted (printed). You will also have to zoom out to gauge your work, especially slight shifts in color and tone. Sometimes when you work ‘zoomed in’ for a period of time, you will zoom out and notice things just don’t look right. Your working method (think like a painter in front of a big canvas) should include zooming in to work on areas, zooming out to judge your work, and zooming to 100% to confirm everything looks okay.
Aesthetic decisions
Sometimes, no matter what, you can’t fix the image, or a detail can’t be repaired. A nose may be missing completely for instance. In this case, you will have to build up a nose from the rest of the face, or clone a nose from another source and then adjust it to match the image. In other situations, you may choose to remove an element from an image rather than repair it (if you have the freedom to do so---do you have a client?). Sometimes, we have to change an image to make it appear normal. Think creatively, what could normal look like?

1 Comments:
RETOUCH MAN LIVES ON FOREVER.
Post a Comment
Subscribe to Post Comments [Atom]
<< Home